Finally learnt how to sharpen my knives
YOUTUBE INSPIRATIONS
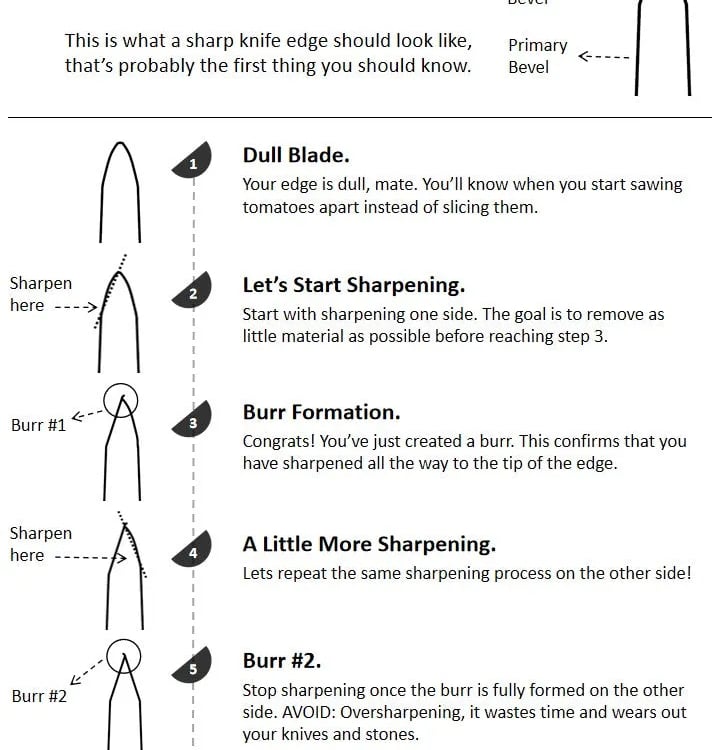
Today I attended a knife sharpening workshop with Dan at semi black. He really goes into the detail step by step on how to sharpen a knife. Although I’ve seen this diagram before, he went into much more detail that helped me understand how to truly sharpen a knife.
I first got my knives from Zwilling as they're budget friendly and good quality. But over time they got dull and I had to exert a lot more strength to slice things. Recently I managed to sharpen it in an amateur way on a rough stone, and it became a pleasure to use the knife again. Things just slice almost effortlessly, like slicing thin tomato slices. It became so fun to use that I look forward to cooking and slicing things again. So I think it's a skill every serious cook should invest in.

When I first saw this diagram, I went ahead to sharpen my own knife on a lobster stone which I didn’t know what grit it was. Eventually I learnt it was 220 and I went really hard to sharpen a knife and ended up scratching it really badly, and also suffered some abrasions on my thumbs and fingers that bled red on the whetstone.
Dan first taught me how to diagnose a knife by using a clean paper to cut through. A kitchen towel won’t work as well as a printing paper. Cut through at a slant angle, about 30 degrees so the paper won’t curl as the blade goes through. From the paper cut, we can tell a few things. One is how smooth the cut is. We run the entire blade through the paper to know if there are any blunt spots. If the knife couldn’t even cut through the paper, it’s very blunt. Secondly, observe closely if there are any fine paper threads. That tells us whether the knife has an even edge or has a curled burl, which we’ll learn why it’s so important to get a burl in sharpening knives.
So the first thing I learnt is that I actually don’t need to apply so much strength or pressure on the blade while rubbing it on the stone. I just need a gentle press like poking into a dough, but maintaining it to rub the blade evenly throughout the stone.
Secondly it’s to get the angle right by calibrating on a digital angle meter. But realistically we don’t sharpen knives with that so it comes down to muscle memory and using our fingers nail a guide. Calibrate it once on the digital meter for about a 15 degrees angle while resting the blade on the finger. Then lift the finger off the stone and maintain that blade angle. If I forget the feel, go back to the finger.
Thirdly it’s to recognise the rubbing effects on the blade. Just 5 passes is enough to make a difference on the texture of the blade. Essentially we’re removing material off the edge on a straight plane. But the edge could be curled so it flattens as material is removed. The way light reflects on it will change after each pass, so look closely at how the steel surfaces turns from dull to shiny. The shiny parts are where it contacts with the stone while the dull parts did not touch the stone. Ideally we want to keep going until the edge turns shiny throughout, because a dull blade is usually curled, so the lower edges would then shiny first, followed by closer to the tip.
When done right, a burl forms. A Burl is basically curled steel fibres from rubbing on the other side. To detect a Burl, rub the edge on a paper towel. The opposite side of where it was sharpened will have a rougher sound, whereas the sharpened side will be smooth. The knife will be able to cut better now, but it won’t be perfect because the curls would catch onto fibres. So the solution is to sharpen the other side to get rid of the Burl and also flatten the other plane to get a sharp tip.
To deburl, basically run the blade very lightly through the stone to rub it off and we’re done.
He went into more detail like holding a grip and placing fingers near the blade to maintain the angle. Sharpening is all about getting the right angle, rub it’s then remove the Burl.
To maintain the angle, the wrists and fingers stay fixed, while extending the elbows. That helps to get an even stroke every time.
A blade could be curled towards the tip, so the angle has to be finely adjusted by raising the wrist or elbow slightly to get the right 15 degrees angle. Otherwise the curl would eventually disappear and flatten out after lots of sharpening.
Overall it’s an immersive learning experience. I wish I had attended the class earlier so I have more time to browse their knives collection. It would be great if they at least provided bottled mineral water as I got quite thirsty at the end. But overall still worth $50 to learn in-depth from an ex kitchen chef and he really went into the micro details of a blade to get it truly sharp.